An Engine Programmer's Guide to Android External Textures
If you’re an engine programmer working on Android support for a game or rendering engine, you have probably run into “external textures” when dealing with camera preview, video playback, or other producer-backed image streams. They look like textures at the material or shader level, but under the hood they are not regular Texture2D resources owned and filled by the engine.
This article walks through what Android external textures are, why camera and video frames need a different path from normal textures, how SurfaceTexture and ImageReader fit into Android’s producer-consumer model, and how modern rendering/game engines usually wrap these platform-specific objects behind engine-level texture abstractions.
What are External Textures?
Problem Statement
Before defining external textures, let’s clarify the problem they solve.
A camera or video decoder frame is not usually born as a regular GPU Texture2D. A normal Texture2D usually means that the application owns a GPU texture object, knows its format, and can sample it with a regular sampler2D.
Camera and video frames are different. They are produced by Android system components such as the camera HAL or hardware video decoder, and are usually written into hardware-backed buffers allocated by Android’s graphics allocator [1]. These buffers may use YUV formats, multi-plane layouts, vendor-private memory layouts, or tiling/compression schemes that the application should not interpret directly.
When you want to ingest frames from a camera or media decoder, apply custom processing, and render them to the screen, the naive approach is to turn each frame into a regular engine texture. In many engines, that means converting the producer-owned hardware buffer into something that looks like a normal Texture2D.
If we forced every frame into a regular Texture2D, the pipeline would look like this:
- Copy the massive pixel data from hardware memory into CPU-visible memory.
- Convert the data from YUV into a GPU-friendly RGB format.
- Upload to GPU texture as a
Texture2D
Executing this on the CPU every frame destroys rendering performance, drains the battery, and quickly overheats the device. This is the bottleneck External Textures were introduced to solve.
External Texture
An external texture is a way for rendering code to sample an image buffer that was produced outside the rendering API’s normal texture allocation path. Instead of creating a regular texture, filling it from CPU memory, and then sampling it, the app asks Android to connect a producer such as Camera or MediaCodec to a consumer that the GPU can sample from.
By sampling the hardware-backed buffer through the graphics stack, we avoid the expensive app-level CPU copy, CPU-side YUV-to-RGB conversion, and texture upload loop. In the common camera/video rendering path, this gives us the zero-copy behavior we want from the engine’s point of view: the frame stays in graphics-friendly memory and the shader samples it through a backend-specific external image path.
For formats such as camera YUV buffers, the graphics stack can also perform the required format conversion during sampling, so the shader can work with RGB-like color values instead of manually decoding YUV planes.
The Producer-Consumer architecture in Android
Let’s first look at how the Producer-Consumer architecture works in Android.
Take the Camera API as an example: the camera acts as the “Producer,” providing a stream of captured frame data. To receive this data, we provide a “Consumer”, which is a surface that consumes the stream:
1
2
3
4
5
6
7
8
9
10
11
12
13
14
15
16
17
18
19
20
21
22
// 1. We have a Surface, but the Camera doesn't know (or care) what is behind it.
val myConsumerSurface: Surface = getSurfaceFromSomewhere()

// 2. We tell the Camera to send its output to this Surface
val captureRequestBuilder = cameraDevice.createCaptureRequest(CameraDevice.TEMPLATE_PREVIEW)
captureRequestBuilder.addTarget(myConsumerSurface)

// 3. We create the session, officially connecting the Producer (Camera) to the Consumer (Surface)
cameraDevice.createCaptureSession(
    listOf(myConsumerSurface),
    object : CameraCaptureSession.StateCallback() {
        override fun onConfigured(session: CameraCaptureSession) {
            // Start pumping frames into the Surface
            session.setRepeatingRequest(captureRequestBuilder.build(), null, null)
        }

        override fun onConfigureFailed(session: CameraCaptureSession) {
            // Handle failure
        }
    },
    null
)
Note: You can also do entirely in C++, but for this article, I’m going to assume we have a Java/Kotlin app with a native C++ rendering engine library under the hood.
Notice what is happening in the code above: the Camera API only asks for a Surface. A Surface in Android is essentially a handle to a buffer queue. The Camera (the Producer) does not know, nor does it care, where those pixels are actually going. It just pushes frames into the Surface.
The flow is roughly like this:
1
2
3
4
5
6
7
8
9
10
11
Camera / MediaCodec
        |
        v
      Surface
        |
        v
   BufferQueue
        |
        +--> SurfaceTexture -> GL_TEXTURE_EXTERNAL_OES -> OpenGL ES
        |
        +--> ImageReader    -> HardwareBuffer          -> Vulkan/OpenGLES import
Let’s talk about the most common Consumer first: SurfaceTexture.
SurfaceTexture
SurfaceTexture is the usual OpenGL ES path for Android external textures. It provides a Surface that producers can write into, while exposing the latest queued buffer as a GL_TEXTURE_EXTERNAL_OES texture to the rendering thread [2].
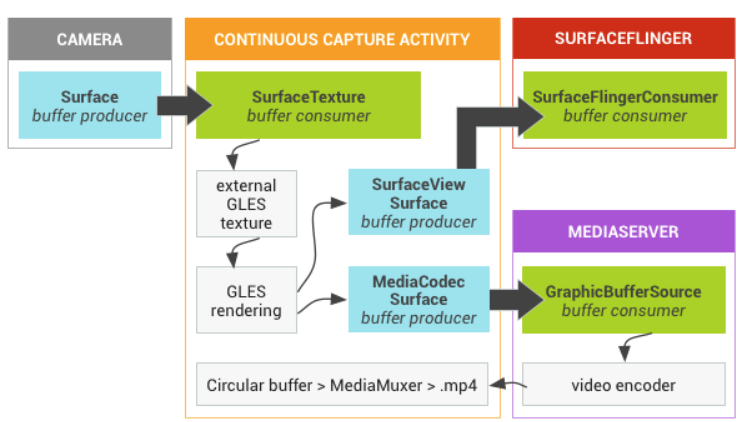
Basically, you generate an OpenGL texture ID and bind it to GL_TEXTURE_EXTERNAL_OES. You then pass that texture ID into a new SurfaceTexture, which you wrap in an Android Surface.
1
2
3
4
5
6
7
8
9
10
11
12
13
14
15
16
17
// 1. Generate a standard OpenGL texture ID
val textures = IntArray(1)
GLES20.glGenTextures(1, textures, 0)
val textureId = textures[0]

// 2. Bind it to the EXTERNAL_OES target (Crucial: DO NOT use GL_TEXTURE_2D)
GLES20.glBindTexture(GLES11Ext.GL_TEXTURE_EXTERNAL_OES, textureId)
GLES20.glTexParameterf(GLES11Ext.GL_TEXTURE_EXTERNAL_OES, GLES20.GL_TEXTURE_MIN_FILTER, GLES20.GL_LINEAR.toFloat())
GLES20.glTexParameterf(GLES11Ext.GL_TEXTURE_EXTERNAL_OES, GLES20.GL_TEXTURE_MAG_FILTER, GLES20.GL_LINEAR.toFloat())
GLES20.glTexParameteri(GLES11Ext.GL_TEXTURE_EXTERNAL_OES, GLES20.GL_TEXTURE_WRAP_S, GLES20.GL_CLAMP_TO_EDGE)
GLES20.glTexParameteri(GLES11Ext.GL_TEXTURE_EXTERNAL_OES, GLES20.GL_TEXTURE_WRAP_T, GLES20.GL_CLAMP_TO_EDGE)

// 3. Wrap it in a SurfaceTexture, and then a Surface
val surfaceTexture = SurfaceTexture(textureId)
val consumerSurface = Surface(surfaceTexture)
// Now you can pass `consumerSurface` to the Camera API!
For each frame, you call surfaceTexture.updateTexImage() before rendering to sync the latest content to the GPU. You must also call surfaceTexture.getTransformMatrix(matrix) to fetch the correct transformation matrix. This matrix handles device rotation and sensor cropping, and you must multiply your texture coordinates by this matrix in your vertex shader.
1
2
3
4
5
6
7
8
9
10
11
12
13
private val transformMatrix = FloatArray(16)

// Called every frame from your rendering thread (must have an active EGL context)
fun onDrawFrame() {
    // 1. Sync the latest hardware buffer to the OpenGL texture
    surfaceTexture.updateTexImage()

    // 2. Fetch the transformation matrix (handles sensor rotation and cropping)
    surfaceTexture.getTransformMatrix(transformMatrix)

    // 3. Pass the matrix and texture ID down to your C++ engine to draw
    nativeEngine.draw(textureId, transformMatrix)
}
Because you now have a GL texture object that points to the external image stream, you can sample it in your shader and apply post-processing effects:
1
2
3
4
5
6
7
8
9
10
11
12
13
14
15
16
17
18
// Fragment Shader
#extension GL_OES_EGL_image_external : require

precision mediump float;

// Use samplerExternalOES instead of sampler2D
uniform samplerExternalOES uCameraTexture;

// The texture coordinates MUST be multiplied by the transformMatrix in the Vertex Shader
varying vec2 vTexCoord;

void main() {
    // Zero-copy sampling! The hardware handles YUV -> RGB conversion right here.
    vec4 cameraColor = texture2D(uCameraTexture, vTexCoord);

    // Apply any post-processing (e.g., Grayscale, LUTs, etc.)
    gl_FragColor = cameraColor;
}
From the application’s point of view, this avoids the expensive CPU readback and re-upload path. The engine samples the producer’s buffer through samplerExternalOES instead of copying the frame into a regular GL_TEXTURE_2D.
However, you might notice a catch: SurfaceTexture explicitly relies on the GL_TEXTURE_EXTERNAL_OES OpenGL extension. What if our engine runs on Vulkan?
ImageReader
The GLES path works because SurfaceTexture knows how to expose queued Android buffers as GL_TEXTURE_EXTERNAL_OES. Vulkan does not use SurfaceTexture this way. For a Vulkan backend, a more suitable path is to acquire Android HardwareBuffer objects and import them into Vulkan with the VK_ANDROID_external_memory_android_hardware_buffer extension [8].
(Note: You may also use ImageReader with GLES. This guide emphasizes Vulkan here because Vulkan does not have an equivalent of the GLES SurfaceTexture / GL_TEXTURE_EXTERNAL_OES path, and ImageReader + HardwareBuffer is a practical way to acquire Android-produced buffers for Vulkan import.)
A practical Android-side producer/consumer setup for this is ImageReader[3] configured with ImageFormat.PRIVATE[6] and GPU sampling usage [5].
First we create an ImageReader on the Kotlin side:
1
2
3
4
5
6
7
8
9
10
11
12
13
// 1. Create an ImageReader that requests hardware-backed buffers.
// The overload with usage flags requires API 29+.
// ImageFormat.PRIVATE allows the Android graphics allocator (Gralloc) to choose
// the optimal hardware format for the GPU.
val imageReader = ImageReader.newInstance(
    width, height,
    ImageFormat.PRIVATE,
    2, // Max images in the queue
    HardwareBuffer.USAGE_GPU_SAMPLED_IMAGE // Tell Android this will be sampled by the GPU
)

// 2. Connect the Producer (Camera) to our new Consumer
captureRequestBuilder.addTarget(imageReader.surface)
To get the latest data, set a listener and call reader.acquireLatestImage() when a frame is available:
1
2
3
4
5
6
7
8
9
10
11
12
13
14
15
16
17
18
19
20
21
// Process frames as they arrive
imageReader.setOnImageAvailableListener({ reader ->
    // Grab the latest frame
    val image = reader.acquireLatestImage() ?: return@setOnImageAvailableListener

    // Extract the HardwareBuffer (API 28+).
    val hardwareBuffer = image.hardwareBuffer

    if (hardwareBuffer != null) {
        // Pass the hardware buffer across the JNI bridge to your C++ engine
        nativeEngine.drawWithHardwareBuffer(hardwareBuffer)

        // Close the hardware buffer at the end.
        hardwareBuffer.close()

        // Important: The native side must not keep using the Java `HardwareBuffer` object after the Java side closes it
        // unless it has acquired or imported the underlying native resource correctly.
    }
    // Close the image at the end.
    image.close()
}, backgroundHandler)
Note: The API levels are easy to mix up:
AHardwareBufferexists on the native side from API 26 [7].Image.hardwareBufferis available from API 28 [4].- The
ImageReader.newInstance(..., usage)overload used below is available from API 29 [3]. - Vulkan import requires
VK_ANDROID_external_memory_android_hardware_buffer[8].
On the native engine side, the Vulkan flow is roughly [8]:
- Convert the Java
HardwareBufferinto anAHardwareBuffer. - Query its Vulkan properties with
vkGetAndroidHardwareBufferPropertiesANDROID. - Create a compatible
VkImage. - Import the Android hardware buffer memory with
VkImportAndroidHardwareBufferInfoANDROID. - Bind the imported memory to the
VkImage. - Create the image view and sampler.
- If the buffer uses an external or YUV format, configure the required external format and sampler YCbCr conversion path.
- Synchronize producer and consumer access before sampling.
In pseudo-code, the native side looks like this:
1
2
3
4
5
6
7
8
9
10
11
12
13
14
15
16
17
18
19
20
21
22
23
24
25
26
27
28
29
30
31
32
33
34
35
36
37
38
39
40
41
42
43
44
45
46
47
48
49
50
51
52
53
54
55
56
57
58
59
60
61
62
63
64
65
66
67
68
69
70
71
72
73
74
75
76
77
78
79
80
81
82
83
84
85
86
87
88
89
90
#include <android/hardware_buffer_jni.h>
#include <vulkan/vulkan.h>

void importHardwareBufferToVulkan(JNIEnv* env, jobject jHardwareBuffer) {
    AHardwareBuffer* hardwareBuffer =
            AHardwareBuffer_fromHardwareBuffer(env, jHardwareBuffer);
    if (!hardwareBuffer) {
        return;
    }

    // AHardwareBuffer_fromHardwareBuffer() does not acquire an extra reference.
    // If the engine keeps this buffer past the Java-side call, it must acquire it.
    AHardwareBuffer_acquire(hardwareBuffer);

    // 1. Query the Vulkan-side properties of this Android hardware buffer.
    VkAndroidHardwareBufferFormatPropertiesANDROID ahbFormatProps = {
        .sType = VK_STRUCTURE_TYPE_ANDROID_HARDWARE_BUFFER_FORMAT_PROPERTIES_ANDROID,
    };

    VkAndroidHardwareBufferPropertiesANDROID ahbProps = {
        .sType = VK_STRUCTURE_TYPE_ANDROID_HARDWARE_BUFFER_PROPERTIES_ANDROID,
        .pNext = &ahbFormatProps,
    };

    vkGetAndroidHardwareBufferPropertiesANDROID(
            device,
            hardwareBuffer,
            &ahbProps);

    // 2. Create a VkImage compatible with the hardware buffer.
    // In real code, image format / external format / usage must match ahbProps.
    // ahbFormatProps.format may be VK_FORMAT_UNDEFINED, which means the image
    // must be used through the Android external format path.
    VkExternalFormatANDROID externalFormatInfo = {
        .sType = VK_STRUCTURE_TYPE_EXTERNAL_FORMAT_ANDROID,
        .externalFormat = ahbFormatProps.externalFormat,
    };

    VkExternalMemoryImageCreateInfo externalMemoryImageInfo = {
        .sType = VK_STRUCTURE_TYPE_EXTERNAL_MEMORY_IMAGE_CREATE_INFO,
        .pNext = &externalFormatInfo,
        .handleTypes = VK_EXTERNAL_MEMORY_HANDLE_TYPE_ANDROID_HARDWARE_BUFFER_BIT_ANDROID,
    };

    VkImageCreateInfo imageInfo = {
        .sType = VK_STRUCTURE_TYPE_IMAGE_CREATE_INFO,
        .pNext = &externalMemoryImageInfo,
        .imageType = VK_IMAGE_TYPE_2D,
        .format = ahbFormatProps.format,
        .extent = { width, height, 1 },
        .mipLevels = 1,
        .arrayLayers = 1,
        .samples = VK_SAMPLE_COUNT_1_BIT,
        .tiling = VK_IMAGE_TILING_OPTIMAL,
        .usage = VK_IMAGE_USAGE_SAMPLED_BIT,
    };

    VkImage image = VK_NULL_HANDLE;
    vkCreateImage(device, &imageInfo, nullptr, &image);

    // 3. Import the AHardwareBuffer as Vulkan device memory.
    VkImportAndroidHardwareBufferInfoANDROID importInfo = {
        .sType = VK_STRUCTURE_TYPE_IMPORT_ANDROID_HARDWARE_BUFFER_INFO_ANDROID,
        .buffer = hardwareBuffer,
    };

    VkMemoryDedicatedAllocateInfo dedicatedInfo = {
        .sType = VK_STRUCTURE_TYPE_MEMORY_DEDICATED_ALLOCATE_INFO,
        .image = image,
    };

    importInfo.pNext = &dedicatedInfo;

    VkMemoryAllocateInfo allocInfo = {
        .sType = VK_STRUCTURE_TYPE_MEMORY_ALLOCATE_INFO,
        .pNext = &importInfo,
        .allocationSize = ahbProps.allocationSize,
        .memoryTypeIndex = findCompatibleMemoryType(ahbProps.memoryTypeBits),
    };

    VkDeviceMemory memory = VK_NULL_HANDLE;
    vkAllocateMemory(device, &allocInfo, nullptr, &memory);
    vkBindImageMemory(device, image, memory, 0);

    // 4. Create image view, sampler, descriptor, and any required
    // sampler YCbCr conversion before sampling from the shader.
    //
    // Later, when the engine is truly done with the imported resource,
    // pair the acquire above with AHardwareBuffer_release().
}
The important point is that the engine cannot assume the buffer is a normal RGBA image. The format and memory requirements must come from the Android hardware buffer properties.
Once the image, view, sampler, descriptor, and possible YCbCr conversion are set up correctly, the shader may look simple:
1
2
3
4
5
6
7
8
9
10
11
// Vulkan Fragment Shader (GLSL)
#version 450

layout(binding = 0) uniform sampler2D uCameraTexture;

layout(location = 0) in vec2 vTexCoord;
layout(location = 0) out vec4 outColor;

void main() {
    outColor = texture(uCameraTexture, vTexCoord);
}
How Engines Usually Wrap External Textures
Most engines do not expose SurfaceTexture, ImageReader, or AHardwareBuffer directly to materials. Instead, they hide the Android-specific producer/consumer details behind an engine-level texture abstraction.
The common layering looks like this:
1
2
3
4
5
6
7
8
9
10
11
12
13
Android producer object
SurfaceTexture / ImageReader / HardwareBuffer
        |
        v
Backend import layer
GL_TEXTURE_EXTERNAL_OES / EGLImage / VkImage import
        |
        v
Engine abstraction
Stream / ExternalTexture / native texture wrapper
        |
        v
Material or shader binding
The main design question for an engine is not just “how do I import the Android buffer?” It is also “what stable object should the material system see, and who owns the lifetime of the underlying platform image?”
Filament
Filament exposes Android external images through two related but different abstractions: Texture [9] and Stream[10].
External Texture
For a single external image, Filament can create a texture with Texture::Builder::external() and then update its backing image with Texture::setExternalImage().
Conceptually:
1
2
3
4
5
6
7
8
9
10
11
Android / platform external image
EGLImage / platform image handle
        |
        v
Texture::setExternalImage()
        |
        v
filament::Texture
        |
        v
Material parameter
This is useful when the engine wants to treat the external image as a texture-like resource that is manually updated by the application or platform layer. It is close to the usual engine texture abstraction, but it still has external-image restrictions: the external image defines the real size and format, only LOD 0 is meaningful, and filtering and wrap modes are limited.
Unlike a regular Filament texture, its contents are not uploaded from CPU pixel data with Texture::setImage(). Instead, the texture is backed by an OS-specific external image provided through Texture::setExternalImage().
Stream
For producer-driven camera or video streams, Filament also provides Stream. A Stream represents an external image source that changes over time. The modern Android path is to feed the stream with acquired images such as AHardwareBuffer by calling Stream::setAcquiredImage() whenever a new frame is available.
Conceptually:
1
2
3
4
5
6
7
8
9
10
11
12
13
ImageReader-acquired AHardwareBuffer
        |
        v
filament::Stream
        |
        v
Stream::setAcquiredImage()
        |
        v
Texture::setExternalStream()
        |
        v
Material parameter
The key difference is the update model. setExternalImage() says “bind this external image to this texture.” Stream says “this texture samples from a producer-backed image source that receives new acquired images over time.” With setAcquiredImage(), the application also provides the release callback Filament should invoke when it is done with the buffer.
Unreal Engine
Unreal uses a registry-style abstraction. External textures are registered with a GUID, and the material system can later resolve that GUID into the actual RHI texture and sampler [11].
Conceptually:
1
2
3
4
5
6
7
8
9
10
External producer image
        |
        v
RHI texture + sampler + coordinate transform
        |
        v
FExternalTextureRegistry
        |
        v
Material external texture parameter
This is a useful engine design pattern because it separates the material-facing identity of the texture from the platform object that backs it. The external image can be updated, replaced, or unregistered without exposing the Android object itself to the material API. Unreal’s registry also stores coordinate scale / rotation / offset data, which maps nicely to the transform metadata we discussed earlier for camera and video frames.
Unity
Unity exposes a thinner wrapper. Texture2D.CreateExternalTexture() creates a Unity Texture2D object from an externally created native texture object. The native object differs according to the platform [12].
Conceptually:
1
2
3
4
5
6
7
8
9
10
Android / native plugin owns producer and import
        |
        v
Native texture handle
        |
        v
Texture2D.CreateExternalTexture()
        |
        v
Unity material / renderer
This means Unity’s engine-facing object is still a Texture2D, but the actual producer, Android buffer import, synchronization, and lifetime management are typically handled by native plugin code. If the underlying native texture changes, Texture2D.UpdateExternalTexture() can retarget the Unity texture wrapper to another native texture object [13].
Comparison
| Engine | External texture abstraction | Update model | Key idea |
|---|---|---|---|
| Filament | Texture::external() + setExternalImage(), or Stream + setExternalStream() + setAcquiredImage() | Manual image binding, or acquired-image stream updates | Separates single external image from streaming external source |
| Unreal Engine | FExternalTextureRegistry | Register / update texture by GUID | Material resolves external texture through a registry |
| Unity | Texture2D.CreateExternalTexture() / UpdateExternalTexture() | Native plugin owns the handle, Unity wraps it | External native texture appears as a Unity Texture2D |
Across these engines, the shared lesson is that Android external textures usually need two layers of abstraction:
- A platform/backend layer that owns
SurfaceTexture,ImageReader,HardwareBuffer, GL external textures, EGL images, or Vulkan imports. - An engine/material layer that exposes a stable object such as
Stream, externalTexture, registry GUID, or texture wrapper.
This separation keeps Android-specific lifetime, synchronization, and format handling out of the material system, while still allowing shaders to sample the latest producer frame.
References
[2] SurfaceTexture
[3] ImageReader
[6] HardwareBuffer.USAGE_GPU_SAMPLED_IMAGE
[7] AHardwareBuffer
[8] VK_ANDROID_external_memory_android_hardware_buffer
[10] Filament Stream.h
[11] Unreal Engine FExternalTextureRegistry